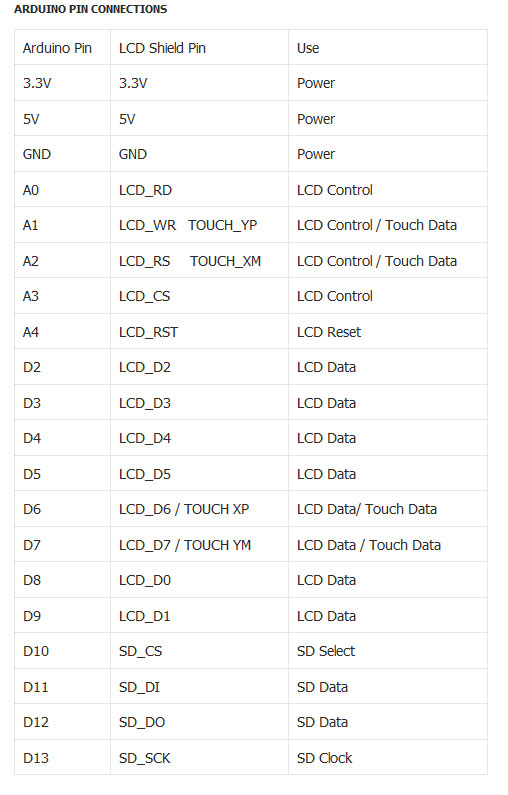
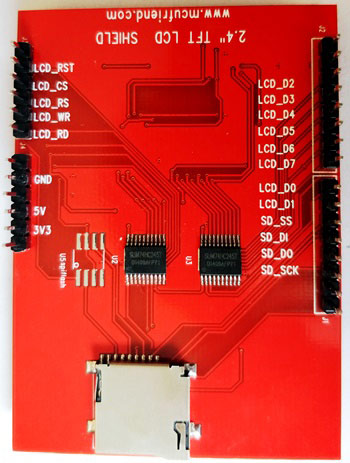
شیلد را به آرامی بر روی آردوینو UNO قرار داده به گونهای که اتصالات بین پایهها مطابق با جدولی که مشاهده میکنید برقرار شود.
معرفی و راهاندازی شیلد و ماژول نمایشگر لمسی ۲٫۴ اینچ آردوینو
همه مقالات ->
همه مقالات 4456
5 کاربر آکادمی پارتینه
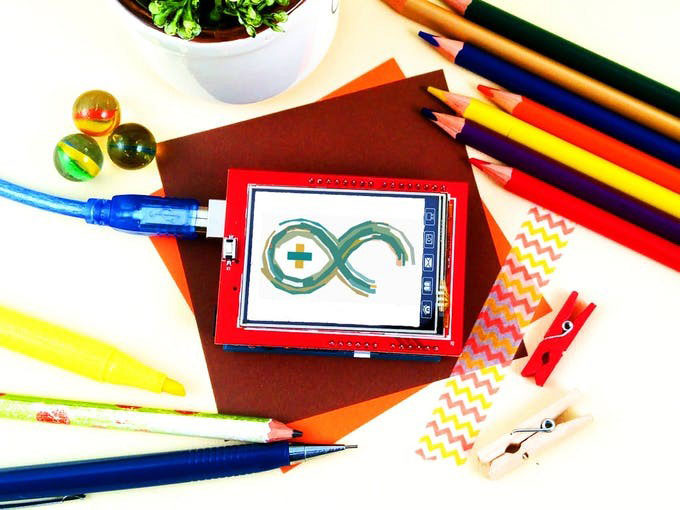
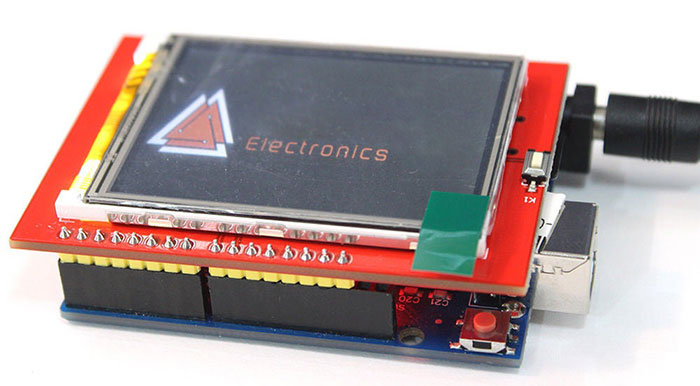
مروری بر ویژگیهای شیلد و ماژول نمایشگر لمسی ۲٫۴ اینچ آردوینو
به طور کلی نمایشگرها نقش مهمی در پروژههای الکترونیکی دارند. از انواع مختلف نمایشگرها از جمله سون سگمنتها یا نمایشگرهای کاراکتری و یا در حالت پیشرفتهتر از OLEDها و نمایشگرهای TFT میتوان استفاده کرد.
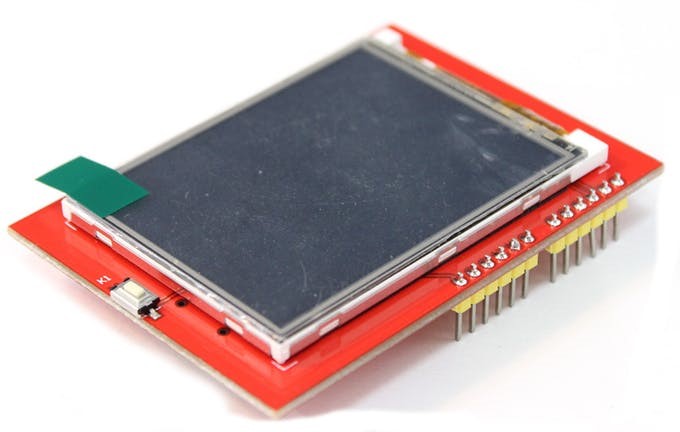
شیلد TFTبا ابعاد 2.4 اینچ یکی از پراستفادهترین نمایشگرهای گرافیکی به شمار میرود. ویژگیهای مهم این نمایشگر عبارتند از :
رزولوشن 240x 320 پیکسل
توانایی نمایش 262000 رنگ مختلف
دارای تاچ اسکرین مقاومتی
دارای تغذیهی 5 ولت
دارای اسلات کارت حافظه Micro SD
در این آموزش نحوهی استفاده از این شیلد مورد بررسی قرار گرفته و سه پروژه عملی اعم از مشاهدهی و نوشتن متن و اشکال هندسی با رنگهای متفاوت ، مشاهده تصاویر رنگی با فرمت BMP و ایجاد نرم افزار نقاشی روی آن پیادهسازی خواهد شد.
کتابخانههای مورد نیاز شیلد TFTشامل موارد زیر است که باید به کتابخانههای آردوینو اضافه شوند.
Adafruit GFX Library
Adafruit TouchScreen Library
TFTLCD Library
Mcufriend Library
مواد اولیه :
| # | عنوان | تعداد | لینک |
|---|---|---|---|
| 0 | برد آردوینو UNO R3 | 1 | لینک خرید |
| 1 | شیلد و ماژول نمایشگر لمسی ۲٫۴ اینچ آردوینو | 1 | لینک خرید |
مرحله 1 : اتصالات و دیاگرام مداری
مرحله 2 : نحوهی کالیبراسیون صفحه لمسی
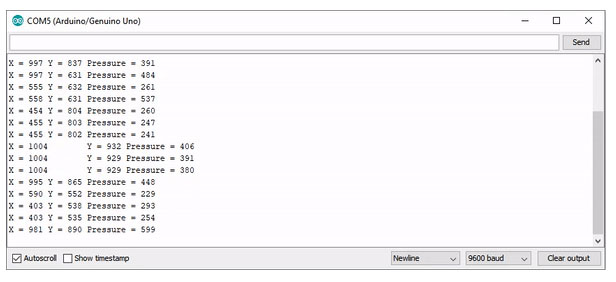
یکی از مهمترین مشخصههای این نمایشگر داشتن پنل لمسی است. اگر قصد استفاده از این قابلیت نمایشگر را دارید باید تنظیمات به گونهای باشد که مختصات نقطهای که لمس کردید به درستی نمایش داده شود. به این منظور برنامه زیر را آپلود کرده و سریال مانیتور کامپایلر آردوینو را باز کنید. سپس یک نقطه از صفحهی نمایش را لمس کرده و میزان مختصات آن را که در مانیتور سریال نمایش داده میشود بخوانید.
#include <stdint.h>

#include "TouchScreen.h"

#define YP A2

#define XM A3

#define YM 8

#define XP 9

// For better pressure precision, we need to know the resistance

// between X+ and X- Use any multimeter to read it

// For the one we're using, its 300 ohms across the X plate

TouchScreen ts = TouchScreen(XP, YP, XM, YM, 300);

void setup(void) {

 Serial.begin(9600);

}

void loop(void) {

 TSPoint p = ts.getPoint();

 if (p.z > ts.pressureThreshhold) {

    Serial.print("X = "); Serial.print(p.x);

    Serial.print(" Y = "); Serial.print(p.y);

    Serial.print(" Pressure = "); Serial.println(p.z);

 }

 delay(100);

}
توسط دستور
TSPoint p = ts.getPoint();مختصات در راستای محورx ، محور y و میزان فشار اعمالی نمایش داده میشود.
مرحله 3 : نمایش متن و اشکال هندسی
برای نمایش متن مورد نظر از برنامه زیر استفاده کنید.
#include <Adafruit_GFX.h>
#include <Adafruit_TFTLCD.h>
#define LCD_CS A3
#define LCD_CD A2
#define LCD_WR A1
#define LCD_RD A0
#define LCD_RESET A4
#define BLACK       0x0000
#define BLUE        0x001F
#define RED         0xF800
#define GREEN       0x07E0
#define CYAN        0x07FF
#define MAGENTA     0xF81F
#define YELLOW      0xFFE0
#define WHITE       0xFFFF
#define ORANGE      0xFD20
#define GREENYELLOW 0xAFE5
#define NAVY        0x000F
#define DARKGREEN   0x03E0
#define DARKCYAN    0x03EF
#define MAROON      0x7800
#define PURPLE      0x780F
#define OLIVE       0x7BE0
#define LIGHTGREY   0xC618
#define DARKGREY    0x7BEF
Adafruit_TFTLCD tft(LCD_CS, LCD_CD, LCD_WR, LCD_RD, LCD_RESET);
void setup() {
 Serial.begin(9600);
 Serial.println(F("TFT LCD test"));
#ifdef USE_ADAFRUIT_SHIELD_PINOUT
 Serial.println(F("Using Adafruit 2.4\" TFT Arduino Shield Pinout"));
#else
 Serial.println(F("Using Adafruit 2.4\" TFT Breakout Board Pinout"));
#endif
 Serial.print("TFT size is ");
 Serial.print(tft.width());
 Serial.print("x");
 Serial.println(tft.height());
 tft.reset();
 uint16_t identifier = tft.readID();
 if (identifier == 0x9325) {
   Serial.println(F("Found ILI9325 LCD driver"));
 } else if (identifier == 0x9328) {
   Serial.println(F("Found ILI9328 LCD driver"));
 } else if (identifier == 0x7575) {
   Serial.println(F("Found HX8347G LCD driver"));
 } else if (identifier == 0x9341) {
   Serial.println(F("Found ILI9341 LCD driver"));
 } else if (identifier == 0x8357) {
   Serial.println(F("Found HX8357D LCD driver"));
 } else {
   Serial.print(F("Unknown LCD driver chip: "));
   Serial.println(identifier, HEX);
   Serial.println(F("If using the Adafruit 2.4\" TFT Arduino shield, the line:"));
   Serial.println(F("  #define USE_ADAFRUIT_SHIELD_PINOUT"));
   Serial.println(F("should appear in the library header (Adafruit_TFT.h)."));
   Serial.println(F("If using the breakout board, it should NOT be #defined!"));
   Serial.println(F("Also if using the breakout, double-check that all wiring"));
   Serial.println(F("matches the tutorial."));
   return;
 }
 tft.begin(identifier);
 Serial.println(F("Benchmark                Time (microseconds)"));
 Serial.print(F("Screen fill              "));
 Serial.println(FillScreen());
 delay(500);
 tft.setTextColor(YELLOW);
 tft.setCursor(70, 180);
 tft.setTextSize(1);
 tft.println("Partineh");
 delay(200);
 tft.fillScreen(PURPLE);
 tft.setCursor(50, 170);
 tft.setTextSize(2);
 tft.println("Partineh ");
 delay(200);
 tft.fillScreen(PURPLE);
 tft.setCursor(20, 160);
 tft.setTextSize(3);
 tft.println("Partineh ");
 delay(500);
 tft.fillScreen(PURPLE);
 for (int rotation = 0; rotation < 4; rotation++) { tft.setRotation(rotation); tft.setCursor(0, 0); tft.setTextSize(3); tft.println("Electropeak"); delay(700); } delay(500); Serial.print(F("Rectangles (filled) ")); Serial.println(testFilledRects(YELLOW, MAGENTA)); delay(500); } void loop() { } unsigned long FillScreen() { unsigned long start = micros(); tft.fillScreen(RED); delay(500); tft.fillScreen(GREEN); delay(500); tft.fillScreen(BLUE); delay(500); tft.fillScreen(WHITE); delay(500); tft.fillScreen(MAGENTA); delay(500); tft.fillScreen(PURPLE); delay(500); return micros() - start; } unsigned long testFilledRects(uint16_t color1, uint16_t color2) { unsigned long start, t = 0; int n, i, i2, cx = tft.width() / 2 - 1, cy = tft.height() / 2 - 1; tft.fillScreen(BLACK); n = min(tft.width(), tft.height()); for (i = n; i > 0; i -= 6) {
   i2    = i / 2;
   start = micros();
   tft.fillRect(cx - i2, cy - i2, i, i, color1);
   t    += micros() - start;
   // Outlines are not included in timing results
   tft.drawRect(cx - i2, cy - i2, i, i, color2);
 }
 return t;
}
مرحله 4 : نمایش تصاویر با فرمت BMP
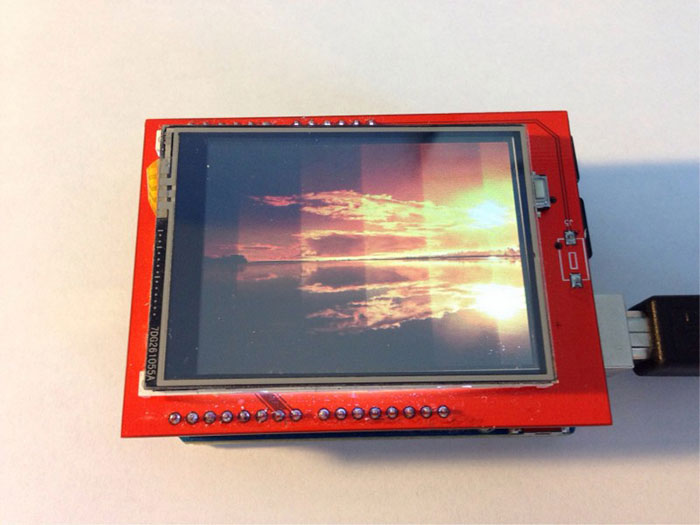
برای نمایش تصاویر از تابع زیر استفاده میشود. این تابع دارای 3 آرگومان است. اولین مورد نام تصویر مورد نظراست و آرگومانهای دوم و سوم برای مختصات طول و عرض گوشه سمت چپ بالای تصویر است.
bmpdraw(“filename.bmp”,x,y);به منظور نمایش تصاویر لازم است که آنها را تبدیل به تصاویر 24 بیتی از نوع BMP با سایز 240x320 تبدیل کنید. تصاویر را در کارت حافظهی SD ذخیره کرده و SD کارت را درون اسلات نمایشگر قرار دهید.
/*
 This code is TFTLCD Library Example
*/

#include <Adafruit_GFX.h>
#include <Adafruit_TFTLCD.h>
#include <SD.h>
#include <SPI.h>

#define LCD_CS A3
#define LCD_CD A2
#define LCD_WR A1
#define LCD_RD A0

#define SD_CS 10

Adafruit_TFTLCD tft(LCD_CS, LCD_CD, LCD_WR, LCD_RD, A4);

void setup()
{
  Serial.begin(9600);

  tft.reset();

  uint16_t identifier = tft.readID();

  if (identifier == 0x9325) {
    Serial.println(F("Found ILI9325 LCD driver"));
  } else if (identifier == 0x9328) {
    Serial.println(F("Found ILI9328 LCD driver"));
  } else if (identifier == 0x7575) {
    Serial.println(F("Found HX8347G LCD driver"));
  } else if (identifier == 0x9341) {
    Serial.println(F("Found ILI9341 LCD driver"));
  } else if (identifier == 0x8357) {
    Serial.println(F("Found HX8357D LCD driver"));
  } else {
    Serial.print(F("Unknown LCD driver chip: "));
    Serial.println(identifier, HEX);
    Serial.println(F("If using the Adafruit 2.4" TFT Arduino shield, the line:"));
    Serial.println(F("  #define USE_ADAFRUIT_SHIELD_PINOUT"));
    Serial.println(F("should appear in the library header (Adafruit_TFT.h)."));
    Serial.println(F("If using the breakout board, it should NOT be #defined!"));
    Serial.println(F("Also if using the breakout, double-check that all wiring"));
    Serial.println(F("matches the tutorial."));
    return;
  }

  tft.begin(identifier);

  Serial.print(F("Initializing SD card..."));
  if (!SD.begin(SD_CS)) {
    Serial.println(F("failed!"));
    return;
  }
  Serial.println(F("OK!"));

  bmpDraw("pic1.bmp", 0, 0);
  delay(1000);
  bmpDraw("pic2.bmp", 0, 0);
  delay(1000);
  bmpDraw("pic3.bmp", 0, 0);
  delay(1000);
}

void loop()
{

}

#define BUFFPIXEL 20

void bmpDraw(char *filename, int x, int y) {

  File     bmpFile;
  int      bmpWidth, bmpHeight;   // W+H in pixels
  uint8_t  bmpDepth;              // Bit depth (currently must be 24)
  uint32_t bmpImageoffset;        // Start of image data in file
  uint32_t rowSize;               // Not always = bmpWidth; may have padding
  uint8_t  sdbuffer[3 * BUFFPIXEL]; // pixel in buffer (R+G+B per pixel)
  uint16_t lcdbuffer[BUFFPIXEL];  // pixel out buffer (16-bit per pixel)
  uint8_t  buffidx = sizeof(sdbuffer); // Current position in sdbuffer
  boolean  goodBmp = false;       // Set to true on valid header parse
  boolean  flip    = true;        // BMP is stored bottom-to-top
  int      w, h, row, col;
  uint8_t  r, g, b;
  uint32_t pos = 0, startTime = millis();
  uint8_t  lcdidx = 0;
  boolean  first = true;

  if ((x >= tft.width()) || (y >= tft.height())) return;

  Serial.println();
  Serial.print(F("Loading image '"));
  Serial.print(filename);
  Serial.println(''');
  // Open requested file on SD card
  if ((bmpFile = SD.open(filename)) == NULL) {
    Serial.println(F("File not found"));
    return;
  }

  // Parse BMP header
  if (read16(bmpFile) == 0x4D42) { // BMP signature
    Serial.println(F("File size: ")); Serial.println(read32(bmpFile));
    (void)read32(bmpFile); // Read & ignore creator bytes
    bmpImageoffset = read32(bmpFile); // Start of image data
    Serial.print(F("Image Offset: ")); Serial.println(bmpImageoffset, DEC);
    // Read DIB header
    Serial.print(F("Header size: ")); Serial.println(read32(bmpFile));
    bmpWidth  = read32(bmpFile);
    bmpHeight = read32(bmpFile);
    if (read16(bmpFile) == 1) { // # planes -- must be '1'
      bmpDepth = read16(bmpFile); // bits per pixel
      Serial.print(F("Bit Depth: ")); Serial.println(bmpDepth);
      if ((bmpDepth == 24) && (read32(bmpFile) == 0)) { // 0 = uncompressed

        goodBmp = true; // Supported BMP format -- proceed!
        Serial.print(F("Image size: "));
        Serial.print(bmpWidth);
        Serial.print('x');
        Serial.println(bmpHeight);

        // BMP rows are padded (if needed) to 4-byte boundary
        rowSize = (bmpWidth * 3 + 3) & ~3;

        // If bmpHeight is negative, image is in top-down order.
        // This is not canon but has been observed in the wild.
        if (bmpHeight < 0) { bmpHeight = -bmpHeight; flip = false; } // Crop area to be loaded w = bmpWidth; h = bmpHeight; if ((x + w - 1) >= tft.width())  w = tft.width()  - x;
        if ((y + h - 1) >= tft.height()) h = tft.height() - y;

        // Set TFT address window to clipped image bounds
        tft.setAddrWindow(x, y, x + w - 1, y + h - 1);

        for (row = 0; row < h; row++) { // For each scanline...
          // Seek to start of scan line.  It might seem labor-
          // intensive to be doing this on every line, but this
          // method covers a lot of gritty details like cropping
          // and scanline padding.  Also, the seek only takes
          // place if the file position actually needs to change
          // (avoids a lot of cluster math in SD library).
          if (flip) // Bitmap is stored bottom-to-top order (normal BMP)
            pos = bmpImageoffset + (bmpHeight - 1 - row) * rowSize;
          else     // Bitmap is stored top-to-bottom
            pos = bmpImageoffset + row * rowSize;
          if (bmpFile.position() != pos) { // Need seek?
            bmpFile.seek(pos);
            buffidx = sizeof(sdbuffer); // Force buffer reload
          }

          for (col = 0; col < w; col++) { // For each column... // Time to read more pixel data? if (buffidx >= sizeof(sdbuffer)) { // Indeed
              // Push LCD buffer to the display first
              if (lcdidx > 0) {
                tft.pushColors(lcdbuffer, lcdidx, first);
                lcdidx = 0;
                first  = false;
              }
              bmpFile.read(sdbuffer, sizeof(sdbuffer));
              buffidx = 0; // Set index to beginning
            }

            // Convert pixel from BMP to TFT format
            b = sdbuffer[buffidx++];
            g = sdbuffer[buffidx++];
            r = sdbuffer[buffidx++];
            lcdbuffer[lcdidx++] = tft.color565(r, g, b);
          } // end pixel
        } // end scanline
        // Write any remaining data to LCD
        if (lcdidx > 0) {
          tft.pushColors(lcdbuffer, lcdidx, first);
        }
        Serial.print(F("Loaded in "));
        Serial.print(millis() - startTime);
        Serial.println(" ms");
      } // end goodBmp
    }
  }

  bmpFile.close();
  if (!goodBmp) Serial.println(F("BMP format not recognized."));
}

// These read 16- and 32-bit types from the SD card file.
// BMP data is stored little-endian, Arduino is little-endian too.
// May need to reverse subscript order if porting elsewhere.

uint16_t read16(File f) {
  uint16_t result;
  ((uint8_t *)&result)[0] = f.read(); // LSB
  ((uint8_t *)&result)[1] = f.read(); // MSB
  return result;
}

uint32_t read32(File f) {
  uint32_t result;
  ((uint8_t *)&result)[0] = f.read(); // LSB
  ((uint8_t *)&result)[1] = f.read();
  ((uint8_t *)&result)[2] = f.read();
  ((uint8_t *)&result)[3] = f.read(); // MSB
  return result;
}
مرحله 5 : ایجاد برنامه نقاشی
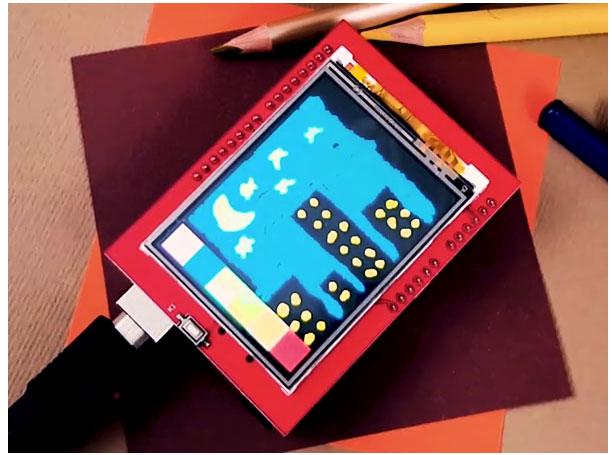
با استفاده از برنامه زیر برنامهای مشابه با Paint ویندوز ایجاد میشود.
/*
 This code is TFTLCD Library Example
*/

#include <Adafruit_GFX.h>
#include <Adafruit_TFTLCD.h>
#include <TouchScreen.h>

#if defined(__SAM3X8E__)
    #undef __FlashStringHelper::F(string_literal)
    #define F(string_literal) string_literal
#endif

#define YP A3
#define XM A2
#define YM 9
#define XP 8

#define TS_MINX 150
#define TS_MINY 120
#define TS_MAXX 920
#define TS_MAXY 940

TouchScreen ts = TouchScreen(XP, YP, XM, YM, 300);

#define LCD_CS A3
#define LCD_CD A2
#define LCD_WR A1
#define LCD_RD A0
#define LCD_RESET A4

#define  BLACK   0x0000
#define BLUE    0x001F
#define RED     0xF800
#define GREEN   0x07E0
#define CYAN    0x07FF
#define MAGENTA 0xF81F
#define YELLOW  0xFFE0
#define WHITE   0xFFFF

Adafruit_TFTLCD tft(LCD_CS, LCD_CD, LCD_WR, LCD_RD, LCD_RESET);

#define BOXSIZE 40
#define PENRADIUS 3
int oldcolor, currentcolor;

void setup(void) {
  Serial.begin(9600);
  Serial.println(F("Paint!"));

  tft.reset();

  uint16_t identifier = tft.readID();

  if(identifier == 0x9325) {
    Serial.println(F("Found ILI9325 LCD driver"));
  } else if(identifier == 0x9328) {
    Serial.println(F("Found ILI9328 LCD driver"));
  } else if(identifier == 0x7575) {
    Serial.println(F("Found HX8347G LCD driver"));
  } else if(identifier == 0x9341) {
    Serial.println(F("Found ILI9341 LCD driver"));
  } else if(identifier == 0x8357) {
    Serial.println(F("Found HX8357D LCD driver"));
  } else {
    Serial.print(F("Unknown LCD driver chip: "));
    Serial.println(identifier, HEX);
    Serial.println(F("If using the Adafruit 2.4" TFT Arduino shield, the line:"));
    Serial.println(F("  #define USE_ADAFRUIT_SHIELD_PINOUT"));
    Serial.println(F("should appear in the library header (Adafruit_TFT.h)."));
    Serial.println(F("If using the breakout board, it should NOT be #defined!"));
    Serial.println(F("Also if using the breakout, double-check that all wiring"));
    Serial.println(F("matches the tutorial."));
    return;
  }

  tft.begin(identifier);

  tft.fillScreen(BLACK);

  tft.fillRect(0, 0, BOXSIZE, BOXSIZE, RED);
  tft.fillRect(BOXSIZE, 0, BOXSIZE, BOXSIZE, YELLOW);
  tft.fillRect(BOXSIZE*2, 0, BOXSIZE, BOXSIZE, GREEN);
  tft.fillRect(BOXSIZE*3, 0, BOXSIZE, BOXSIZE, CYAN);
  tft.fillRect(BOXSIZE*4, 0, BOXSIZE, BOXSIZE, BLUE);
  tft.fillRect(BOXSIZE*5, 0, BOXSIZE, BOXSIZE, MAGENTA);

  tft.drawRect(0, 0, BOXSIZE, BOXSIZE, WHITE);
  currentcolor = RED;

  pinMode(13, OUTPUT);
}

#define MINPRESSURE 10
#define MAXPRESSURE 1000

void loop()
{
  digitalWrite(13, HIGH);
  TSPoint p = ts.getPoint();
  digitalWrite(13, LOW);


  pinMode(XM, OUTPUT);
  pinMode(YP, OUTPUT);

  if (p.z > MINPRESSURE && p.z < MAXPRESSURE) {


    if (p.y < (TS_MINY-5)) {
      Serial.println("erase");

      tft.fillRect(0, BOXSIZE, tft.width(), tft.height()-BOXSIZE, BLACK);
    }

    p.x = map(p.x, TS_MINX, TS_MAXX, tft.width(), 0);
    p.y = map(p.y, TS_MINY, TS_MAXY, tft.height(), 0);

    if (p.y < BOXSIZE) {
       oldcolor = currentcolor;

       if (p.x < BOXSIZE) {
         currentcolor = RED;
         tft.drawRect(0, 0, BOXSIZE, BOXSIZE, WHITE);
       } else if (p.x < BOXSIZE*2) {
         currentcolor = YELLOW;
         tft.drawRect(BOXSIZE, 0, BOXSIZE, BOXSIZE, WHITE);
       } else if (p.x < BOXSIZE*3) {
         currentcolor = GREEN;
         tft.drawRect(BOXSIZE*2, 0, BOXSIZE, BOXSIZE, WHITE);
       } else if (p.x < BOXSIZE*4) {
         currentcolor = CYAN;
         tft.drawRect(BOXSIZE*3, 0, BOXSIZE, BOXSIZE, WHITE);
       } else if (p.x < BOXSIZE*5) {
         currentcolor = BLUE;
         tft.drawRect(BOXSIZE*4, 0, BOXSIZE, BOXSIZE, WHITE);
       } else if (p.x < BOXSIZE*6) { currentcolor = MAGENTA; tft.drawRect(BOXSIZE*5, 0, BOXSIZE, BOXSIZE, WHITE); } if (oldcolor != currentcolor) { if (oldcolor == RED) tft.fillRect(0, 0, BOXSIZE, BOXSIZE, RED); if (oldcolor == YELLOW) tft.fillRect(BOXSIZE, 0, BOXSIZE, BOXSIZE, YELLOW); if (oldcolor == GREEN) tft.fillRect(BOXSIZE*2, 0, BOXSIZE, BOXSIZE, GREEN); if (oldcolor == CYAN) tft.fillRect(BOXSIZE*3, 0, BOXSIZE, BOXSIZE, CYAN); if (oldcolor == BLUE) tft.fillRect(BOXSIZE*4, 0, BOXSIZE, BOXSIZE, BLUE); if (oldcolor == MAGENTA) tft.fillRect(BOXSIZE*5, 0, BOXSIZE, BOXSIZE, MAGENTA); } } if (((p.y-PENRADIUS) > BOXSIZE) && ((p.y+PENRADIUS) < tft.height())) {
      tft.fillCircle(p.x, p.y, PENRADIUS, currentcolor);
    }
  }
}نکته پایانی
در صورتیکه بخواهید تصاویر را بدون استفاده از کارت حافظهی SD نمایش دهید ، می توانید آن را به کد تبدیل کرده و نمایش دهید. برای ایجاد انیمیشن می توانید چندین عکس به صورت متوالی و بدون تأخیر نمایش دهید. اما به دلیل پایین بودن سرعت پایین پردازندهی آردوینو UNO توصیه میشود از آردوینو Mega2560 استفاده کنید.
برای نوشتن نظرات ابتدا وارد حساب کاربری خودشوید.
یا