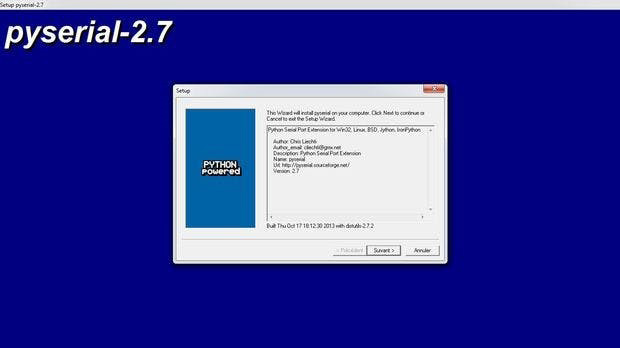
درصورتیکه Python IDLE را قبلا نصب کردهاید، نیازی به انجام این مرحله نیست. به وب سایت پایتون رفته و آخرین ورژن را دانلود کنید. توجه داشته باشید که حتی اگر رایانه 64 بیتی باشد، باید پایتون را به دلیل عدم سازگاری نسخهی 64 بیتی با کتابخانههای آردوینو به صورت 32 بیتی نصب کنید.
برنامه نویسی آردوینو توسط پایتون
همه مقالات ->
همه مقالات 5007
3 کاربر آکادمی پارتینه

زبان برنامه نویسی پایتون به عنوان یکی از زبانهای قدرتمند و متن باز (Open Source) قابلیت استفاده در بوردهای امبدد را نیز دارد. در این آموزش روش نصب پایتون بر روی رایانه و نحوهی استفاده از آن برای بوردهای آردوینو را بررسی کرده و به منظور تست، یک نشانگر LED را روشن و خاموش میکنیم.
نرمافزارهای مورد نیاز شامل موارد زیر است:
Arduino IDE
Python IDLE
PySerial Library
مرحله 1 : نصب نرم افزار پایتون (Python IDLE)
مرحله 2 : کد پایتون
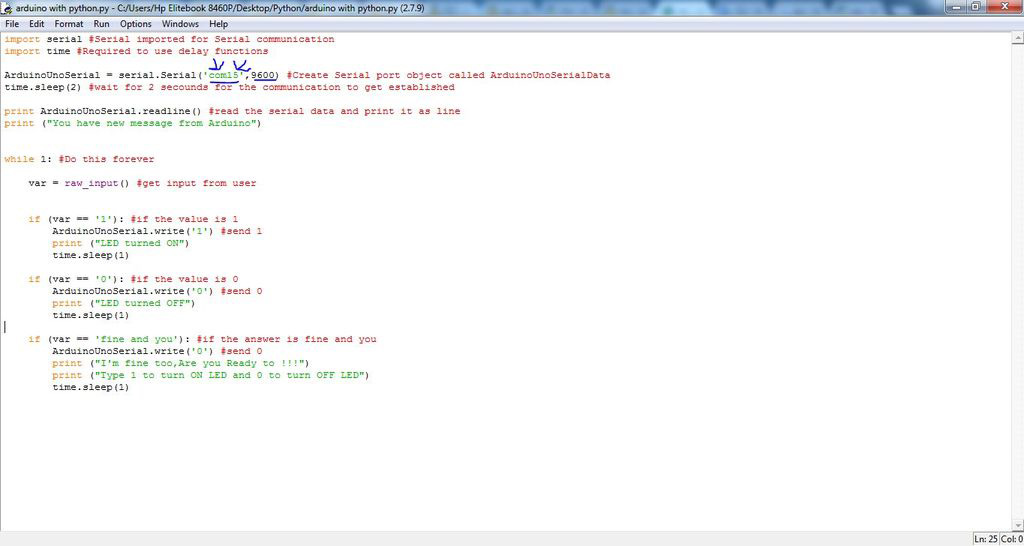
در این مرحله لازم است یک برنامه ساده به منظور دریافت اطلاعات از پورت سریال تنظیم شود.
 import serial                                                              #Serial imported for Serial communication
import time                                                                #Required to use delay functions
ArduinoUnoSerial = serial.Serial('com15',9600)       #Create Serial port object called ArduinoUnoSerialData time.sleep(2)                                                             #wait for 2 secounds for the communication to get established
print ArduinoUnoSerial.readline()                             #read the serial data and print it as line
print ("You have new message from Arduino")
  while 1:         #Do this forever
            var = raw_input()                                          #get input from user
            if (var == '1'):                                                #if the value is 1
                ArduinoUnoSerial.write('1')                      #send 1 to the arduino's Data code
                print ("LED turned ON")
                time.sleep(1)
             if (var == '0'): #if the value is 0
                ArduinoUnoSerial.write('0')            #send 0 to the arduino's Data code
                print ("LED turned OFF")
                time.sleep(1)
             if (var == 'fine and you'): #if the answer is (fine and you)
                ArduinoUnoSerial.write('0') #send 0    to the arduino's Data code
                print ("I'm fine too,Are you Ready to !!!")
                print ("Type 1 to turn ON LED and 0 to turn OFF LED")
               time.sleep(1)
مرحله 3 : کد آردوینو
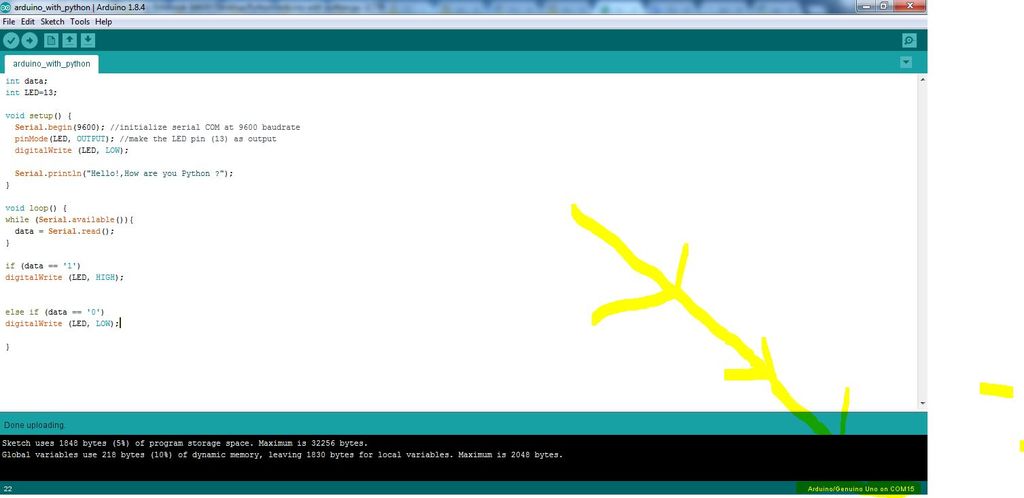
برای شروع ارتباط آردوینو با پایتون شماره پورتی که آردوینو به آن متصل شده است را شناسایی کرده و برنامه BLINK را روی آن آپلود میکنیم. دادههای خروجی نیز قابل مشاهده در کامپایلر پایتون است.
/*
Partineh
Arduino Tutorial Series
Author: Shokoufeh Davarzani
Website: www.Partineh.com
*/
#include <wire.h>

int data;
int LED=13;
void setup() {
  Serial.begin(9600);                               //initialize serial COM at 9600 baudrate
  pinMode(LED, OUTPUT);                    //declare the LED pin (13) as output
  digitalWrite (LED, LOW);                     //Turn OFF the Led in the beginning

  Serial.println("Hello!,How are you Python ?");
}
void loop() {
while (Serial.available())    //whatever the data that is coming in serially and assigning the value to the variable “data”
{
data = Serial.read();
}
if (data == '1')
digitalWrite (LED, HIGH);                  //Turn On the Led
else if (data == '0')
digitalWrite (LED, LOW);                  //Turn OFF the Led
}
برای نوشتن نظرات ابتدا وارد حساب کاربری خودشوید.
یا